Table of contents
Introduction
Car maintenance seems like a daunting task at first. You open the engine bay and you’re greeted by thousands of wires, different hoses, and its extremely overwhelming. Fortunately, PowerShift Auto has your back with an easy Oil Change DIY guide! Learning how to change my own oil was one of the first jobs I learned as a new car enthusiast. Being able to change my own oil allowed me to know the job was being done, the filter was being changed, and opened the door for me to take on different maintenance jobs on my car! Regularly changing your car’s oil is crucial to maintaining your engine’s health and longevity. This step-by-step car maintenance guide will explain how to do an oil change and never worrying about shop prices again.
Preparation

Gather the necessary tools and supplies: You’ll need a wrench, an oil filter wrench, a funnel, an oil pan, a new oil filter, and the appropriate amount and type of new oil. Buy these from your local auto parts store or online to potentially save even more! Check your car’s manual for the proper specifications of your oil change.
Jack up the Car
Park your car on a flat, level surface and use your parking brake. Take your floor jack and lift it high enough to work underneath it, or purchase some ramps and drive your car up on them to create that space.
NEVER under any circumstances performance car maintenance only supported by a floor jack. Use jack stands to support the weight of the vehicle and create a safety barrier for you while working on the car.
Unscrew the screws or release the tabs for the plastic undertray that protects the engine if your car has one.
Drain the Oil
Place your oil drain pan, five gallon bucket, or other receptacle underneath the engine’s oil pan. I like to move the drain pan to where the drain plug is about center with it, to avoid spillage. Take your socket or wrench, seat it on the oil pan drain plug, give it a couple counter-clockwise turns, and the oil should start to drain. Remove the drain plug completely and let the oil fall into your pan.
Let the oil drain completely until there is no drip from the motor.
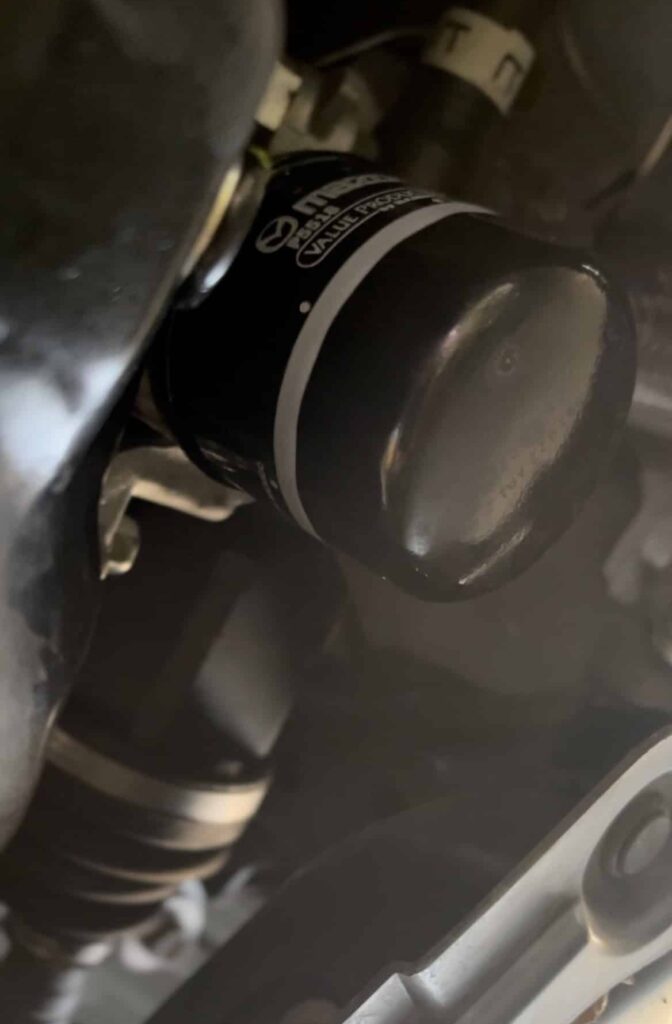
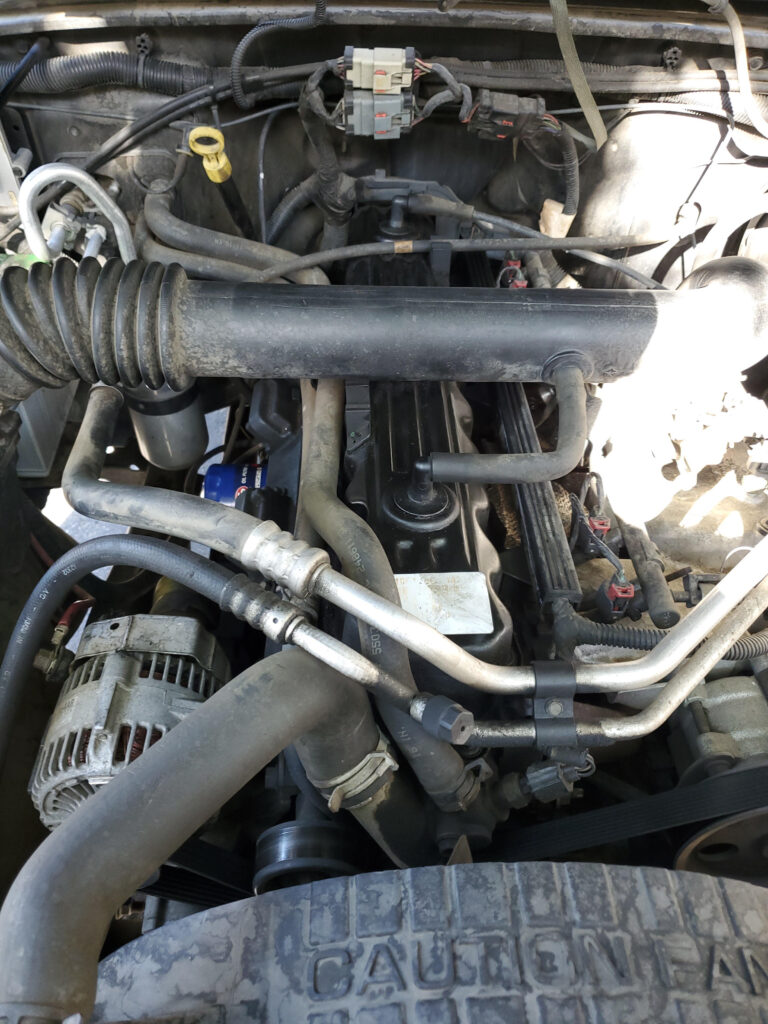
Find the engine oil filter within the engine bay or underneath the vehicle. The oil filter is a cylindrical shaped, sometimes brightly colored, object that is screwed into the engine. Usually, you will see brand names on the filter such as Wix, Fram, Napa, ACDelco, or other companies on the face of it. Turn the filter counter-clockwise to remove it from the engine. While loosening the oil filter, oil will start coming out so prepare to get some oil on your hands!
If the filter is difficult to remove, try an oil filter wrench to break it free from the threads.
Inspect the oil to see how your engine is doing. If you see metal flakes, a milky consistency in the oil, or anything that seems wrong, consult an automotive technician to analyze the problem further.
Fill the Car With Oil
Now that the engine is completely drained of oil, its time to fill it back up. First, take your new oil filter and fill it about halfway. Put a little oil on your finger and lubricate the o-ring on the top of the oil filter with the fresh oil. This will ensure the o-ring is able to seal well and also allow the engine to have some fresh oil already available in the filter.
Screw the new filter back into place with your hand only.
After replacing the filter, put your drain plug back into the oil pan. Once you get the drain plug hand tight, take your socket or wrench and give it a one quarter turn or so just to make sure its properly sealed.
Locate the oil filler cap on your engine. The oil filler cap will have a picture of an oil can on it and will often display the preferred oil type on it as well (hint-hint). Remove the oil filler cap, put a funnel inside of the engine, and start filling it with fresh oil. Refer to your owner’s manual for the proper amount of engine oil needed for full capacity.
Inspect the Car for Oil Leaks
Once the engine is filled with fresh oil and a new filter to keep all of the bad stuff out, turn on your car and let it idle. This will allow the fresh oil to circulate through the engine and ensure its properly lubricated. Take this time to inspect underneath the car to make sure no oil is leaking from the engine.
Let the car run for awhile, turn it off and go back to the engine bay. Locate the oil dipstick and pull it out. Then, wipe the dipstick clean of any oil on it and reinsert it into the hole. After a couple of seconds, remove the dipstick again and check the oil levels. The dipstick will have markings on it to indicate proper levels. Once you verified the oil level is good, you are now ready to hit the road again!
Properly Dispose Of The Old Oil
After you finish changing your car’s oil, you’re going to have a drain pan filled and needing to be disposed of. Fortunately, disposing of the oil is super easy. Simply go to your nearest auto parts store as most of them recycle old engine oil. DO NOT try and dispose of the oil in any trash can or in the ground. Oil, as we’ve seen countless times in oil spills, is very difficult to clean up and is terrible for the environment.
Why Change Your Oil?
Oil is a car’s lubricant and is an absolute necessity for proper function. Clean oil allows for your car to run at peak efficiency, maintaining its power levels and fuel mileage. A car has tons of moving parts in the engine, all with different tolerances and purposes. Without proper lubrication from oil, parts will wear fast and result in a catastrophic engine failure. Also, oil additives in today’s synthetic and conventional oil allow for more contaminants to be removed from the engine.
For a more in depth look, check out Progressive’s article regarding oil changes.
How Often Should You Do An Oil Change?
In today’s world of modern oil, you’ll see a variety of answers on how often you need to change your oil. Generally, I say stick to the manufacturer guidelines in the manual. However, I have noticed in some newer cars that oil change recommendations are coming in at 7,500 to 10,000 miles. That is nonsense.
For me, I don’t feel comfortable going further than 5,000 miles without an oil change. Despite what marketing will say on synthetic oils, I will change my oil at 5,000 miles to ensure my car is running well. Not only are you making sure that oil is being cycled out of the car, but you can catch potential problems earlier when changing oil more regularly.
What If You Don’t Drive A Car Often?
If you live in an urban area where you walk a lot or have a weekend car that doesn’t rack up a lot of miles, it is still recommended to change oil at certain intervals of time. For example, my 1966 Chevrolet Chevelle doesn’t get driven for thousands of miles at a time. To make sure my car is running well, I change the oil in cars that sit for prolonged periods of time at six months.
Frequently Asked Questions
1. Should I Replace The Drain Plug?
Personally, I change the oil drain plug every other time I change my oil. Call me paranoid, but I’m afraid of it to leak. Oil drain plugs are pretty cheap at your local auto parts store, so there isn’t much of a drawback from doing it.
2. How Do I Minimize The Mess?
Oil changes can be messy, especially if you have a spill. When you’re unscrewing the oil filter, some people will use a plastic cup to capture the oil and prevent spills. Another option is if you purchase an oil drain plug like a Fumoto drain plug. This style will allow you to not have to deal with oil getting on you when unscrewing the drain plug. At the bare minimum, consider using latex gloves to keep your hands clean.
3. Do You Really Save Money Doing It Yourself?
Absolutely. Doing your own oil changes allows you to take advantage of auto parts store deals and avoid labor costs from auto shops. Also, it allows you to know exactly what is going into your car and ensure the work is actually done. Unfortunately, some lube shops have scammed people out by not changing fluids or filters. Depending on the amount of oil your car or truck uses, you can save $20-$50 per oil change.
4. My Car’s Oil Filter Is Impossible To Get Off. What Do I Do?
Fortunately, you have come to the blog written by someone who has dealt with this problem and overcome it after hours of agony. Now, there are several solutions to this problem:
- Use an oil filter wrench
- Use channel locks
- When all else fails, hammer a screwdriver through the width of the oil filter and use it like a lever to turn it.
- Dominate the oil filter with an oil filter removal tool like this one.
My dad and I had this issue when changing the oil for the first time in his Chevelle’s new motor. It took us hours because someone decided to overtighten the oil filter. The oil filter removal tool took care of the issue in no time.
To avoid this issue altogether, always remember to only hand tighten oil filters!
Conclusion
Changing your car’s oil at regular intervals is keep to reliability. Being able to change your own oil will inspire you to do more of the maintenance yourself while also allowing you to monitor exactly what is inside your car. The result will be your car running well and your wallet feeling fuller since you saved money from not paying for shop labor prices. Don’t let car maintenance prices keep you down and realize how easy oil changes are.
Want to have your vehicle featured on our website? Contact us on our website, Pinterest, or Instagram!
Affiliate Disclaimer
Powershift Auto is a participant in the Amazon Services LLC Associates Program, an affiliate advertising program designed to provide a means for sites to earn advertising fees by advertising and linking to Amazon.com. This article also contains affiliate links through the CJ affiliate program.
When I link to products and services, those links may be affiliate links. If you click on any of those affiliate links and make a purchase within a certain time frame, I’ll earn a small commission. The commission is paid by the retailers, at no cost to you.
I’m careful to link to products and retailers that I have or would use myself and recommend. Money earned keeps Powershift Auto running and allows it to continue to grow. Thank you for your support.
![]()
Keep up with the latest articles, content, and special offerings by signing up for our email newsletter!